
Department of Education-funded research into creating an effective online education program that includes model rocketry and our very own Jolly Logic AltimeterOne
Category: News
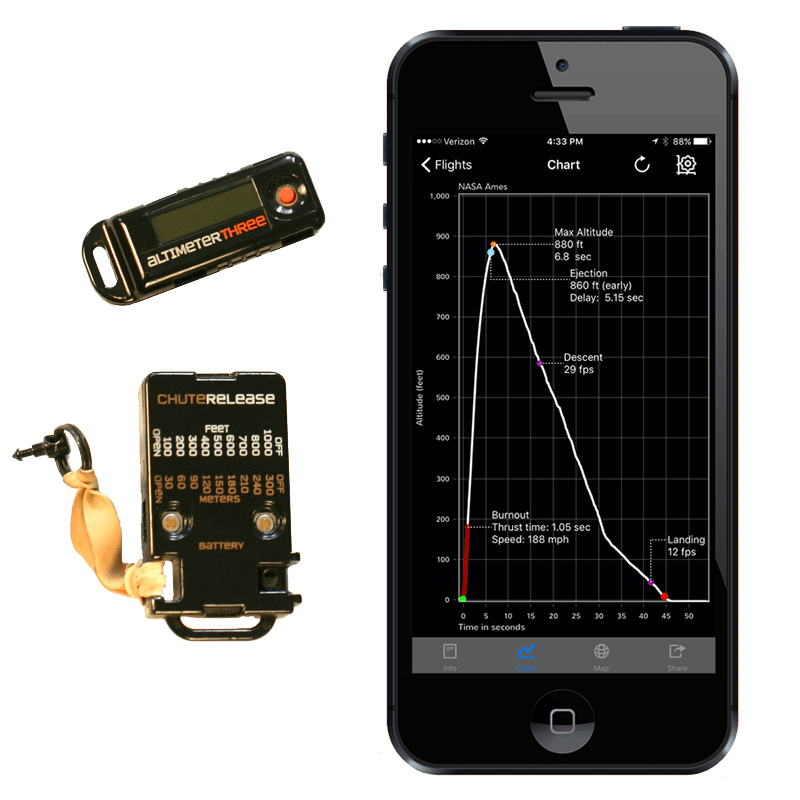
Dude Perfect Has a Field Day with AltimeterThree
AltimeterThree and its iPhone app play referee for five best friends and their rockets.
These guys clearly know how to have fun, and that’s probably why they have millions of viewers.
Chute Release and Water Rocketry
Don Moses of Stratofins created a great video that shows off a number of parachute deployment techniques, including a couple that use Chute Release on fat and slim water rockets.
Check out the video here:
AltimeterThree Flies High in Vienna
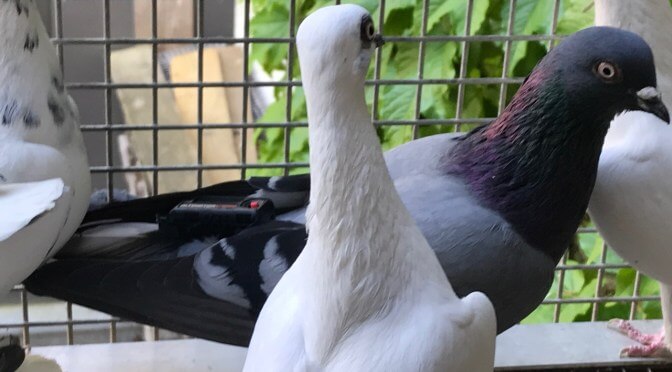
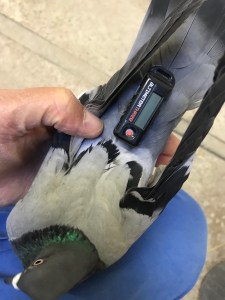
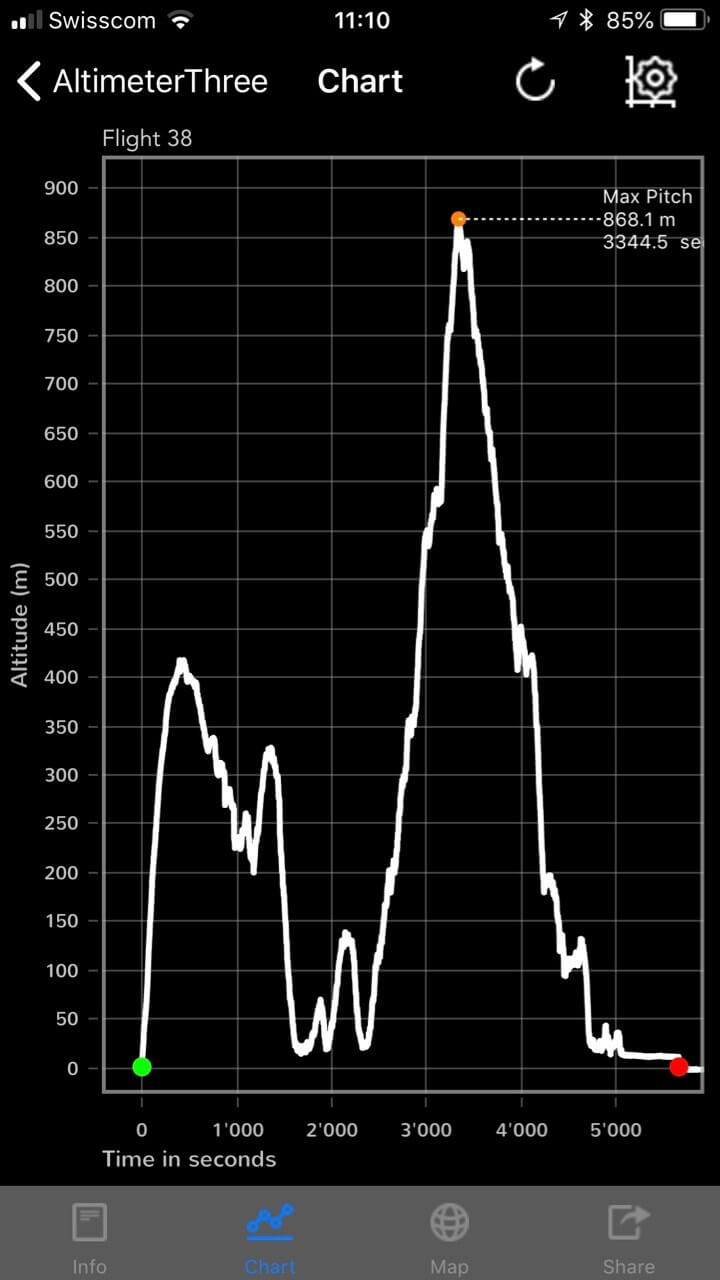
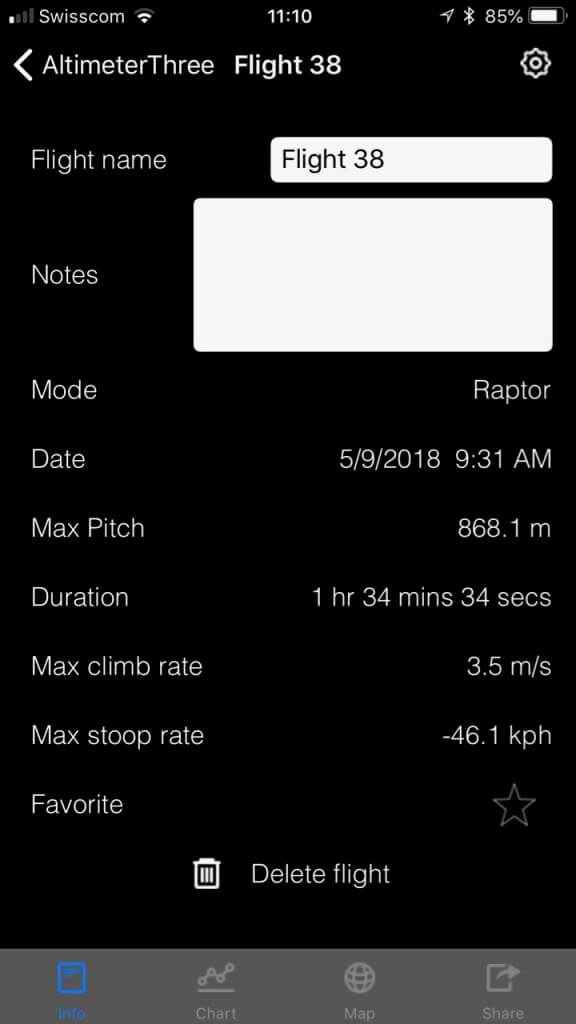
Peter Berger follows in Jürgen von Ramin’s footsteps and uses AltimeterThree to plot the flight performance of his high-flying (868 meters!) pigeons.
He wrote a very nice article about using AltimeterThree for flight performance analysis.
You can read the article (in German) here:
http://www.hochflugtauben.ch/wp/?p=2572
AltimeterThree is Chute Release-aware
For model rocket enthusiasts who use Chute Release, the latest version of the AltimeterThree app now calculates descent rate before and after Chute Release opens. So now you can measure the rocket’s tumble (or drogue) descent rate, then the final landing speed.
To update your app to the latest version, go into the app store on your phone, and search for “AltimeterThree.” Be sure to enter it as all one word.
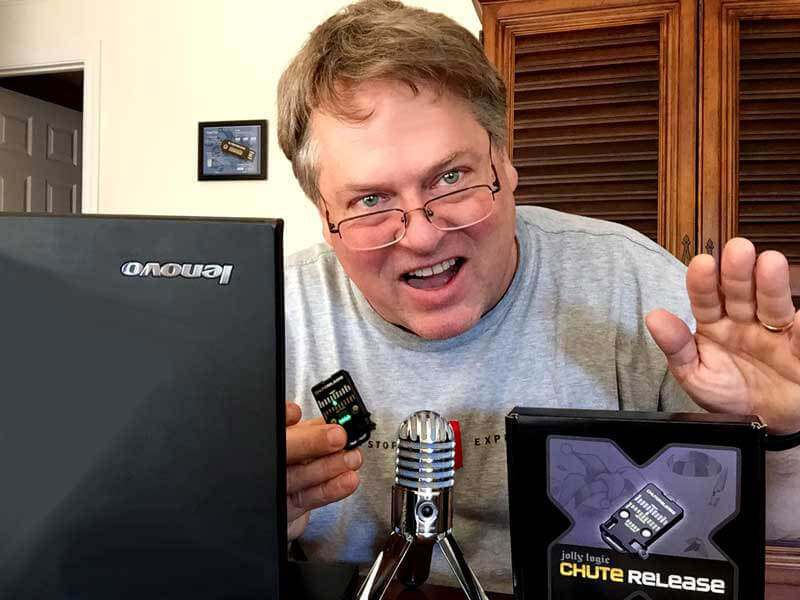
Chute Release Featured on The Rocketry Show
The founder of Jolly Logic, John Beans, recently appeared on The Rocketry Show audio podcast to talk about the development of Chute Release.
Press play below, or on their site here.
User Testing of Chute Release
Tom Disch of WOOSH (Wisconsin Organization of Space Hobbyists) conducted a number of real-world tests of Chute Release, and wrote a great article in his club’s newsletter.
 WOOSH Newsletter May/June 2016
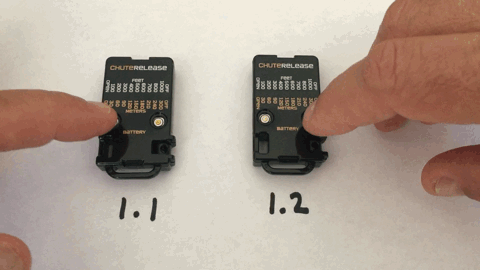
Using Chute Release at High Elevation
If you launch rockets at a location with high elevation, such as some areas in Colorado and Utah, and your Chute Release has version 1.1 firmware on it, you should send it to us to update the firmware. For most people, this will not matter.
Chute Release doesn’t care how high your flights go, but it does care how high they START. The original limitation was 8000 feet (2438 meters) above sea level. This was just arbitrary, we should have made it higher, and it was easy to increase this to 10000 feet, which we’ve since done.
If you have version 1.1 and you try to launch at a location with a pressure altitude (which is affected by weather) of 8000′ (2438 meters) or above, your Chute Release will refuse to initialize. It will flash rapidly and turn off, preventing you from flying with it. Once you update to version 1.2 or higher, you will fine up to 10000′ (3048 meters).
How can you tell which version you own? When you first turn on your Chute Release, it will flash the firmware version right at the start. The first digit is shown on the battery display, the second digit on the altitude display. So it you watch, version 1.1 will flash the first battery light and the 100 feet (30 meters) display right at startup. Version 1.2 will flash the first battery light and the 200 feet (60 meters) display right at the start.
If you don’t fly at high elevation, don’t worry about it. You’re already good to go, even on very high flights!
Chute Release Test Flights (with updates)
(If you haven’t done so already, please read our earlier posts introducing this upcoming product.)
As flight testing of Chute Release has gotten underway, I wanted to begin sharing early results.
Here’s a look from a flight today in California. Other test sites include Minnesota, Colorado, and Washington.
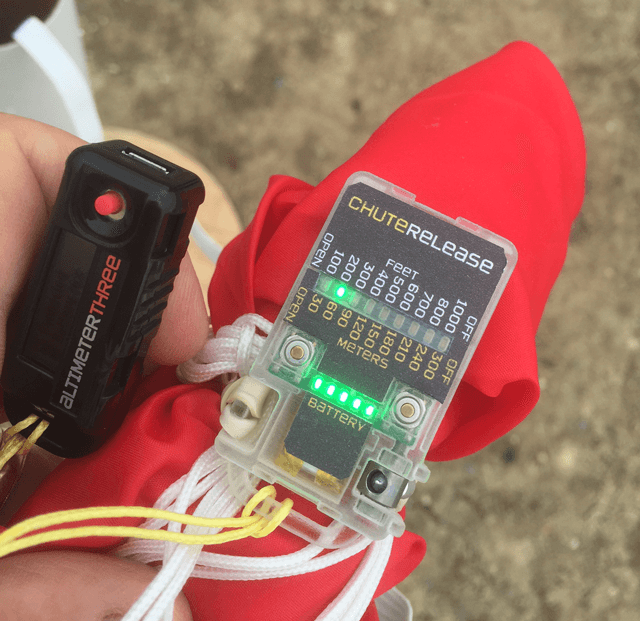
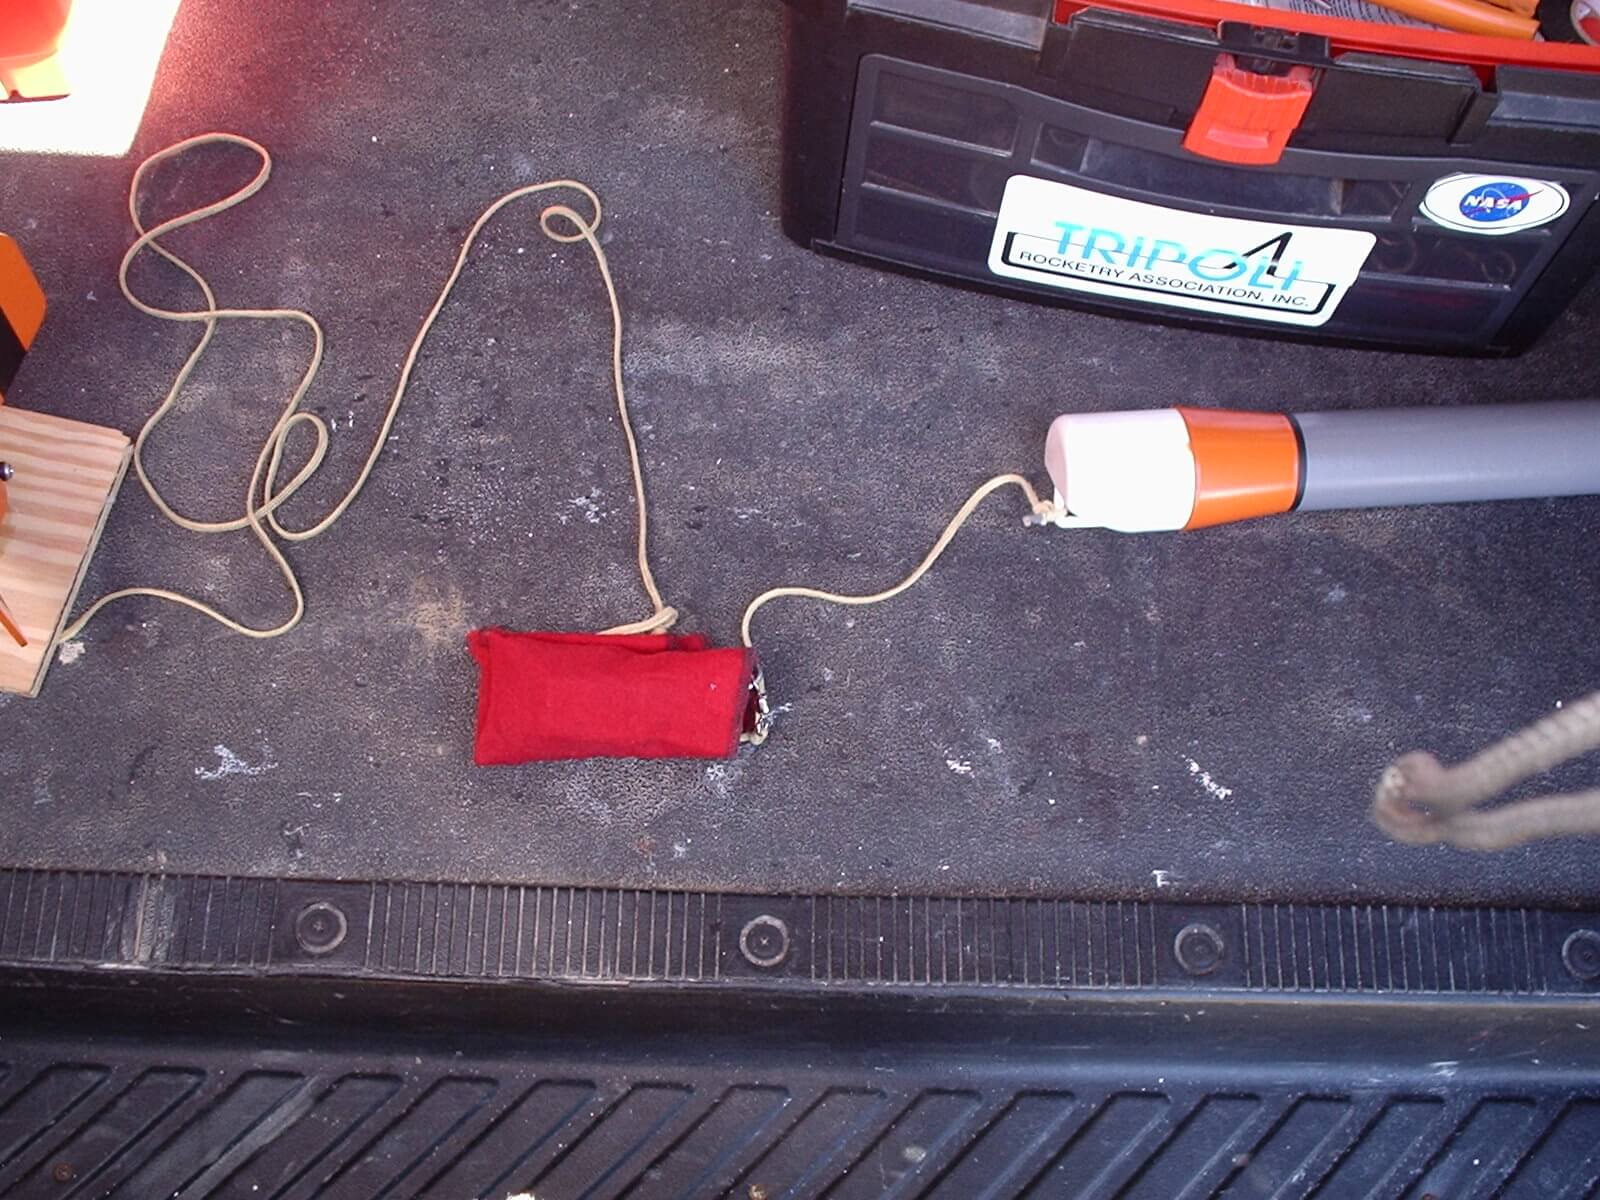
For our setup, we used an Estes Leviathan flying on an F27R-4 motor.
Here’s what our setup looked like:
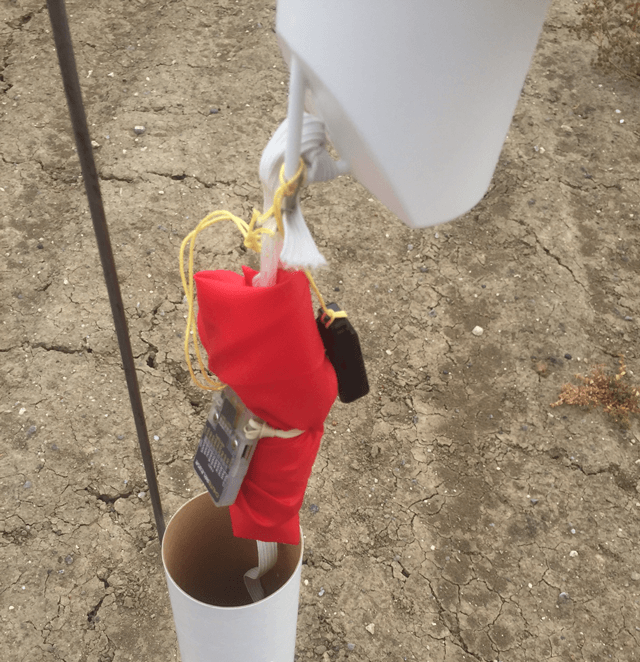
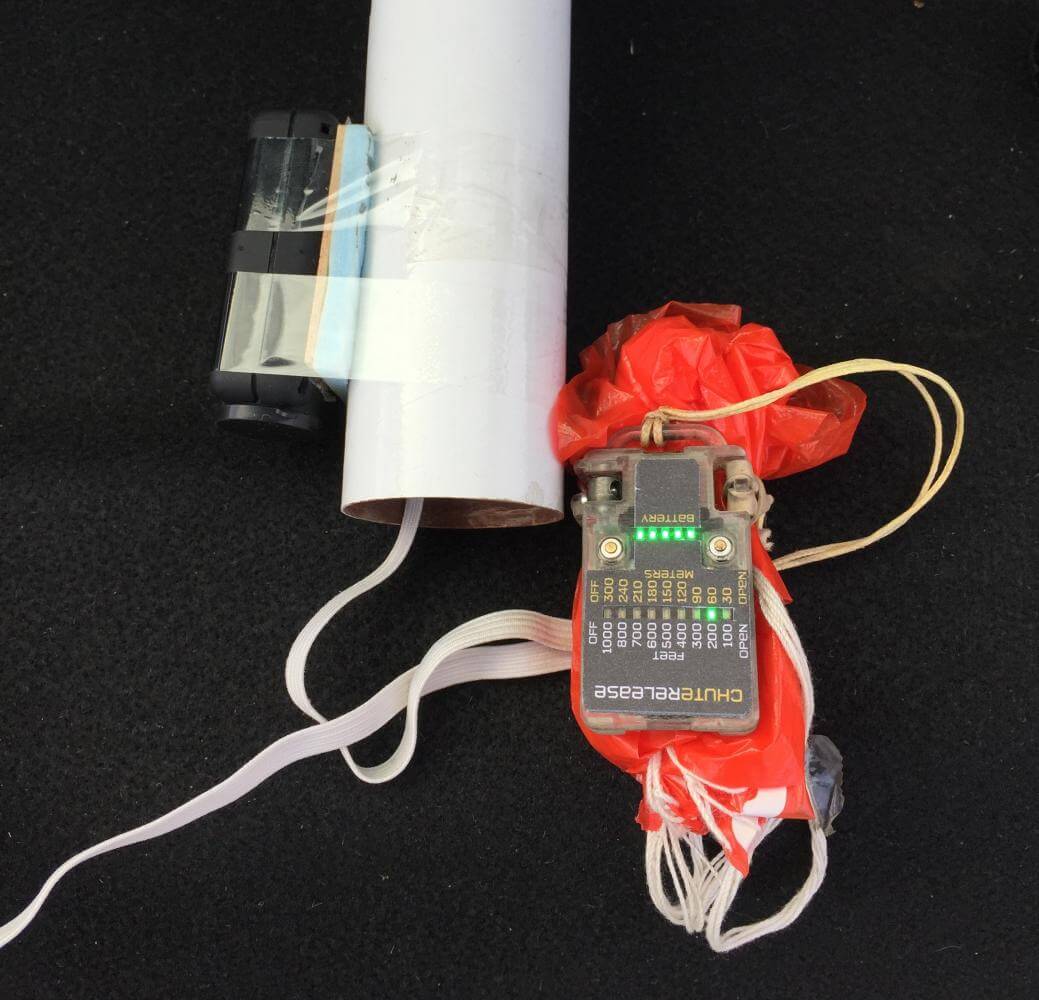
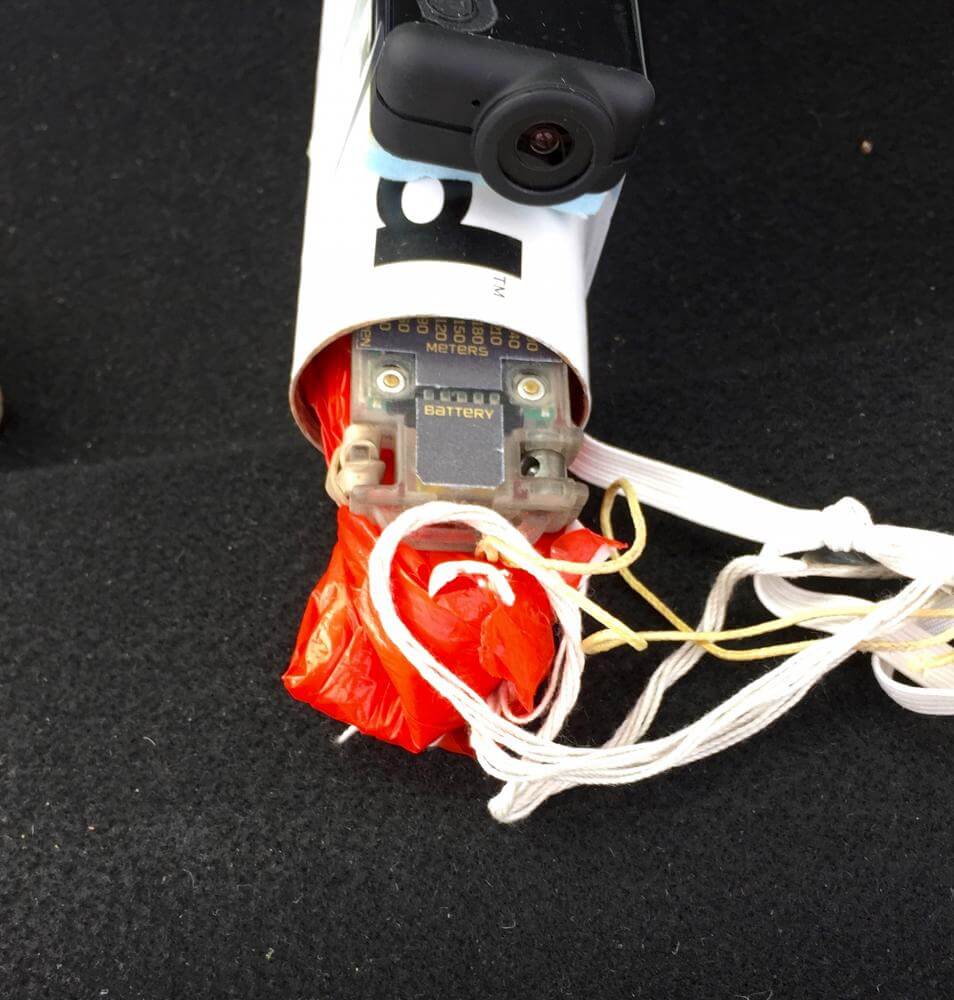
You can see that we’ve rolled our parachute with its shroud lines so that it’s pretty closely tethered to the nosecone. In this way, once the nosecone is popped out, it will immediately drag the parachute bundle free of the fuselage. We’ve also attached AltimeterThree to record the flight.
The flight is expected to go to about 600 feet, which is nice and low for early testing. We set Chute Release to open at 200 ft for this flight. Remember that this is a prototype unit. The final ones will be more polished looking.
Here’s a video of the flight with a slo-mo around the time of release. The quality is not great (no telephoto lens this time), but we’ll get some better ones later. Go fullscreen to try and see the rocket at the time of release, which is at 24 seconds.
The flight landed about 30 feet away from the pad.
Here’s the flight data from AltimeterThree:
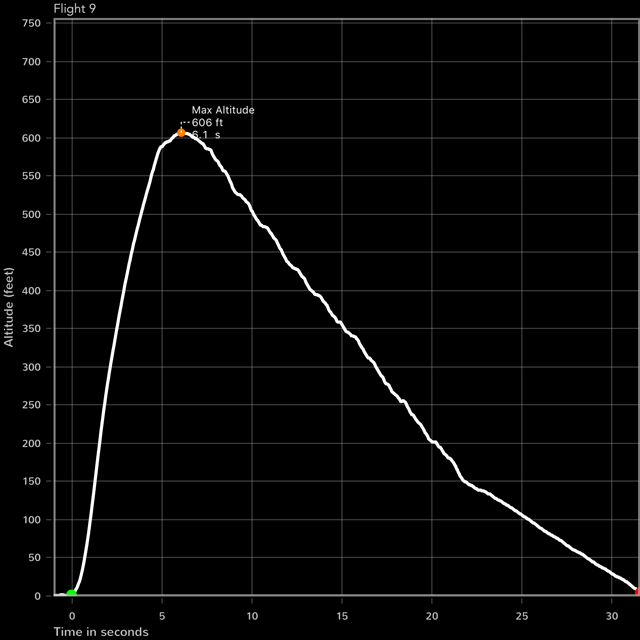
Notice that prior to the chute being released, the rocket was falling at about 30 fps. After activation, it took just over a second for the parachute to fully deploy, and below 150 feet the flight slowed to a safe 15 fps for landing.
As part of the tweaking of the firmware, we’ll probably keep track of what the “minimum deployment time” is. If we find that even the most carefully prepared setups take, for instance, 1 second to open we can adjust the firmware to open 1 second early each time. The goal would be to get the unfurled altitude as close as possible to the altitude setting, at least in the best case.
Of course, if you choose to pack your chute in a way that takes longer to open, you’ll want to add some buffer altitude.
This is a fun gadget to fly with.
More to come!
Update
The previous flights were to about 600 feet. We took Chute Release out for a little higher test yesterday, to above 1000 feet. That’s a little more realistic of a test, since flights above 1000 feet start to require a larger field, and can result in a good bit of walking and hunting on a breezy day.
We once again set Chute Release at 200 feet, but this time we loaded a G77-7R motor. We took the safety step of painting the same rocket we used before a bright Day-Glow Orange in case we needed help spotting and locating it after the flight. It turns out we needn’t have bothered.
Here’s how we wrapped the chute:

The LEDs once again look crazy bright, but they need to be bright to shine through the final product case on a bright day and be visible.
The flight took off normally and punched into the local low clouds. The rocket eventually tumbled down out of them, and right on time the chute appeared to open. Although it was windier than our last flight, the rocket still landed within 100 feet of the pad.
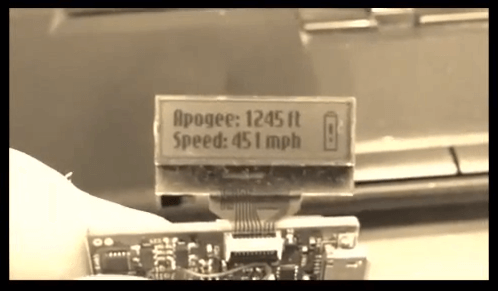
AltimeterThree reported that our flight reached 1375 feet. Here is the data, zoomed in to the critical parachute release point:

What’s especially cool to see in this flight is that the completed release point (where the descent rate changes from about 27 fps to about 17 fps) is right after 200 feet! The way you tell that is to draw line up from the landing and see where the slope of the curve changes. Notice when the chute opens it’s bouncing around still a good bit, but that bend in the curve is right around 200 feet, which is awesome.
Of course, the final performance will always vary a bit depending on how you wrap and hold your parachute with Chute Release. I suspect a tighter wrap with more folds and even a protective blanket or bag might take a good long time to open, so in those cases I would suggest adding 100-400 feet of release altitude to give them time to open. You’ll have fun experimenting with your wrap and your release, I’m sure, and folks can share their tips online.
I’ve learned that the most important things to remember are (and these are pretty basic, I know, but I didn’t always follow them, to my sadness in flights a week ago):
- Always tether Chute Release so that you don’t lose it when it releases
- Most important: chute must come out of fuselage, or nothing after that matters
- A rolled chute can still open pretty quickly
These flights were with a pretty light rocket that tumbled pretty slowly (27-30 fps with the parachute wrapped up). In heavier rockets, it will probably be important to slow the rocket a little during its descent, so we need to experiment with either letting the parachute flap more, or with having a very tiny drogue chute that is never held by the release. The little drogue chute might also serve to pull the chute from the rocket and keep the line from flapping and tangling a bit, too.
Update
Submitted by Bernard Cawley (Washington, October 13, 2015)
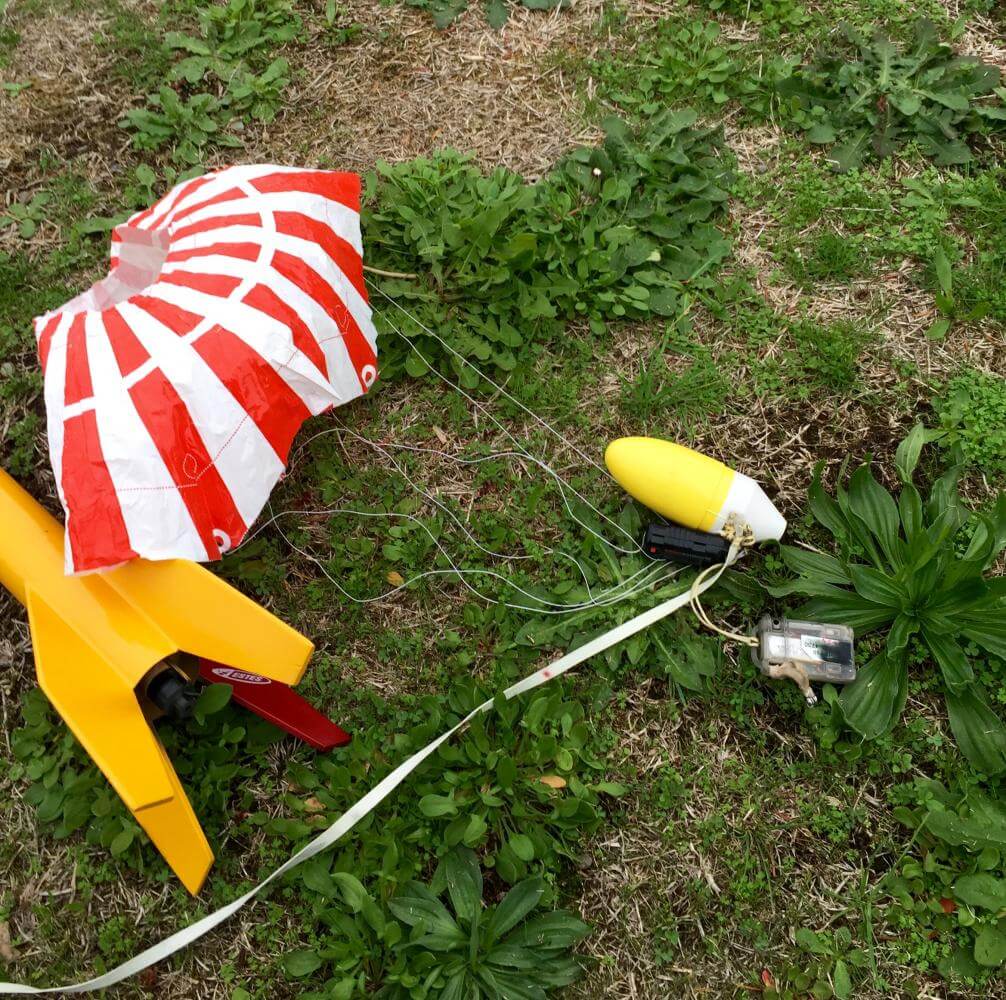
I had the chance to do some flying with a prototype Chute Release this past weekend, and put it into the air 10 times in three different models. Two of them were BT-60 (1.60 inch/40.6mm ID) based models (Estes Vagabond and Big Bertha – both with plastic ‘chutes) and one has a 1.75 inch/44.5mm inside diameter body (Semroc SLS Aero Dart – nylon ‘chute).
The user interface for the Chute Release is super simple, just as described on the Jolly Logic site here. To actually pack the parachutes with the release I basically just folded it as I would have normally, then laid the device on the middle of it, and pulled the rubber band around the other side, plugging the release fitting into its receiving socket on the left side of the CR. I did need to fold the ‘chute a bit more tightly so that the package could slide into (and later out of) the model easily enough. The last step is to turn the device on before putting the package into the rocket. Don’t forget this step!
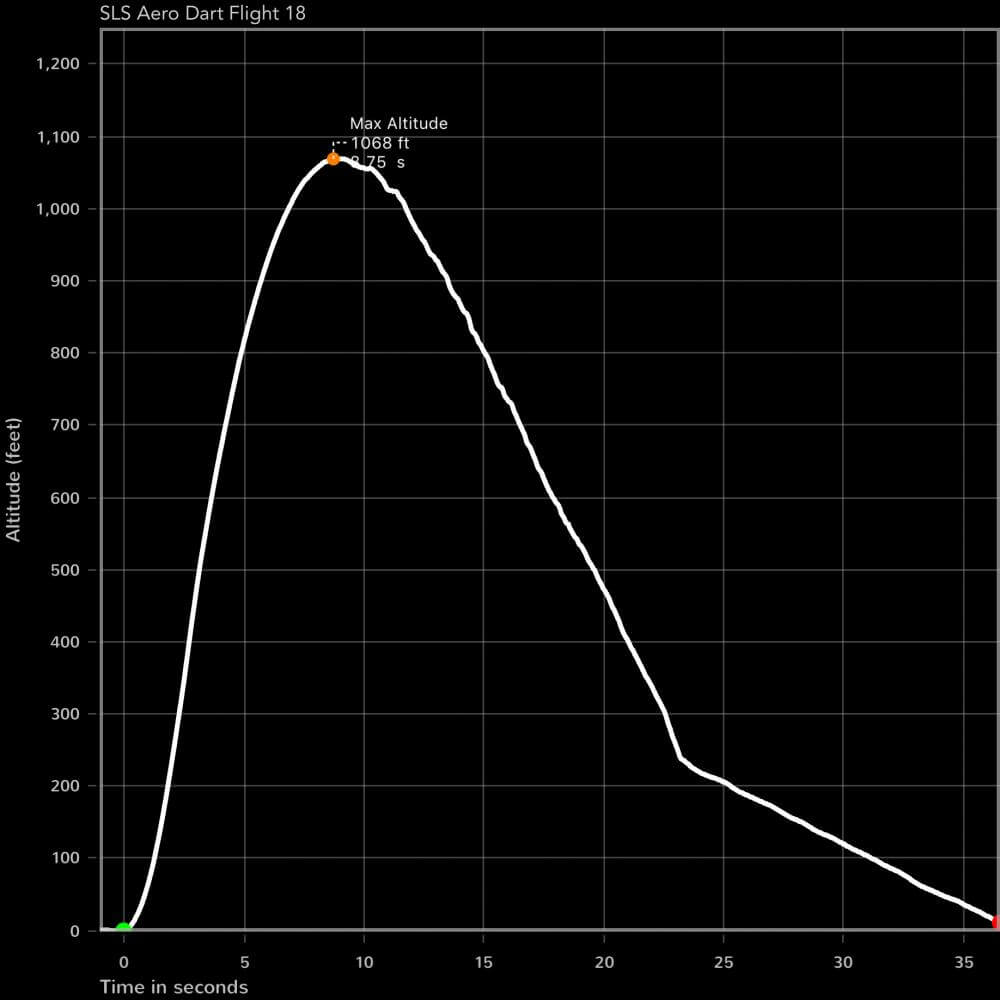
Each of the ten flights also carried an AltimeterThree so I would have altitude vs. time data from each flight to go along with what I could see from the ground. Between the three models I flew the CR to between about 300 feet (Big Bertha on a C6-5 carrying both devices) and 1100 feet (SLS Aero Dart on Estes F15-6s). On all but one flight I had the release set at 200 feet. One of the four Aero Dart flights was set to release at 300 feet. The AltimeterThree graph from that Aero Dart flight, on an Estes F15-6, is attached as well. The knee in the time/altitude curve is very evident.
On every flight, the chute/CR package was ejected as it should be. On eight of them, the ‘chute was released as programmed, with the AltimeterThree data showing the ‘chute as opening fully around 50 feet below the set altitude. Beautiful (and fun to watch). This was clearly shown in the data from the AltimeterThree aboard. I had one non-release – on my second attempt to use the CR – which is why I emphasized TURN IT ON above.
The other flight in which the CR didn’t do its thing was a spectacular Estes E9-6 CATO in which the propellant/delay grain blew out the front of the rocket (and what was left of the motor blew out the back) shortly after liftoff. The A3 on that flight (safely in the payload section) showed an apogee of 48 feet. The ‘chute was melted and separated from the CR and the CR itself was blackened a bit, but that’s all from the CATO. That was the fourth flight of the 10, so you can see that the CR was unfazed by being briefly flame broiled, though it’s not as pretty as it was.
I did get it to false trigger on the ground once. After the I-forgot-to-turn-it-on flight I did a little field repair to the top of the Vagabond’s body tube with some thin CA, and the payload section fit got kind of snug as a result. I put it on and pulled it off a couple of times trying to get the fit to loosen a bit. In the process of doing that I heard the CR release inside the model, so clearly I managed to fake it out this way. At that point I added a small vent hole to the body of the model to avoid that in the future. I put one in the Aero Dart as well – the Big Bertha already had static ports for use with altimeters tied to the nose cone.
By the way, after the 10 flights the battery in the Chute release was still indicating fully charged. The time stamps on the AltimeterThree files show that I did those flights over the course of a little over two and a half hours.
The possibilities that this gadget opens up for models from about 1.6 inches in diameter on up are really intriguing. One that I’m personally excited about is fulfilling my goal to fly a mile high on a fairly small model (no level 2 cert needed). I am not too eager to get into all that one has to in order to do dual deployment (getting black powder, LEUP, etc., etc.) and I was wondering about how I was going to have a reasonable chance of getting the model back (even if I get my EggFinder built and installed). Now I have the answer. For another half-ounce I have a simple, reliable way to deploy the main at 500 feet or 300 feet. I might have to take the drag hit for a larger diameter (rather than being able to go minimum diameter on 29mm motors) but that will be a worthwhile trade I think.
Another is being able to fly higher on our regular club field and still stay reliably ON the field. Based on these first 10 flights, I think we could comfortably fly to 1.5 to two times as high as we normally would allow, depending on winds of the day. Plus the whole cool factor of having the effect of dual deployment that’s this simple to do and fun to watch in action is pretty exciting.
Update
If you’re interested in better video quality, Tim Van Milligan of Apogee Components does a great job of that during his test flights.
Here’s a video of his egglofter rocket with canted fins (to lend his flights spin stabilization). This flight was on an F15 motor. I like how he fastened his parachute closely to his nosecone, so that at ejection the momentum of the nosecone flying off made sure the parachute was pulled from the fuselage. Good technique to try.
Tim set Chute Release for 200 feet in this video, and it’s interesting to note that he did NOT have vents in his rocket. As long as you know that your rocket will eject Chute Release well above 100 feet (so that Chute Release has a few seconds to get acclimated in the air), it should function the same with or without vents.
If you watch the video a few times you can see the moment that Chute Release triggers, as the parachute begins pulling away from the nosecone and the parachute begins to inflate. There was no AltimeterThree onboard to record the flight, but based on timing it probably took about 50-75 feet for the parachute to fully slow the rocket.
Update
By Andrew Kleinhenz, Ohio
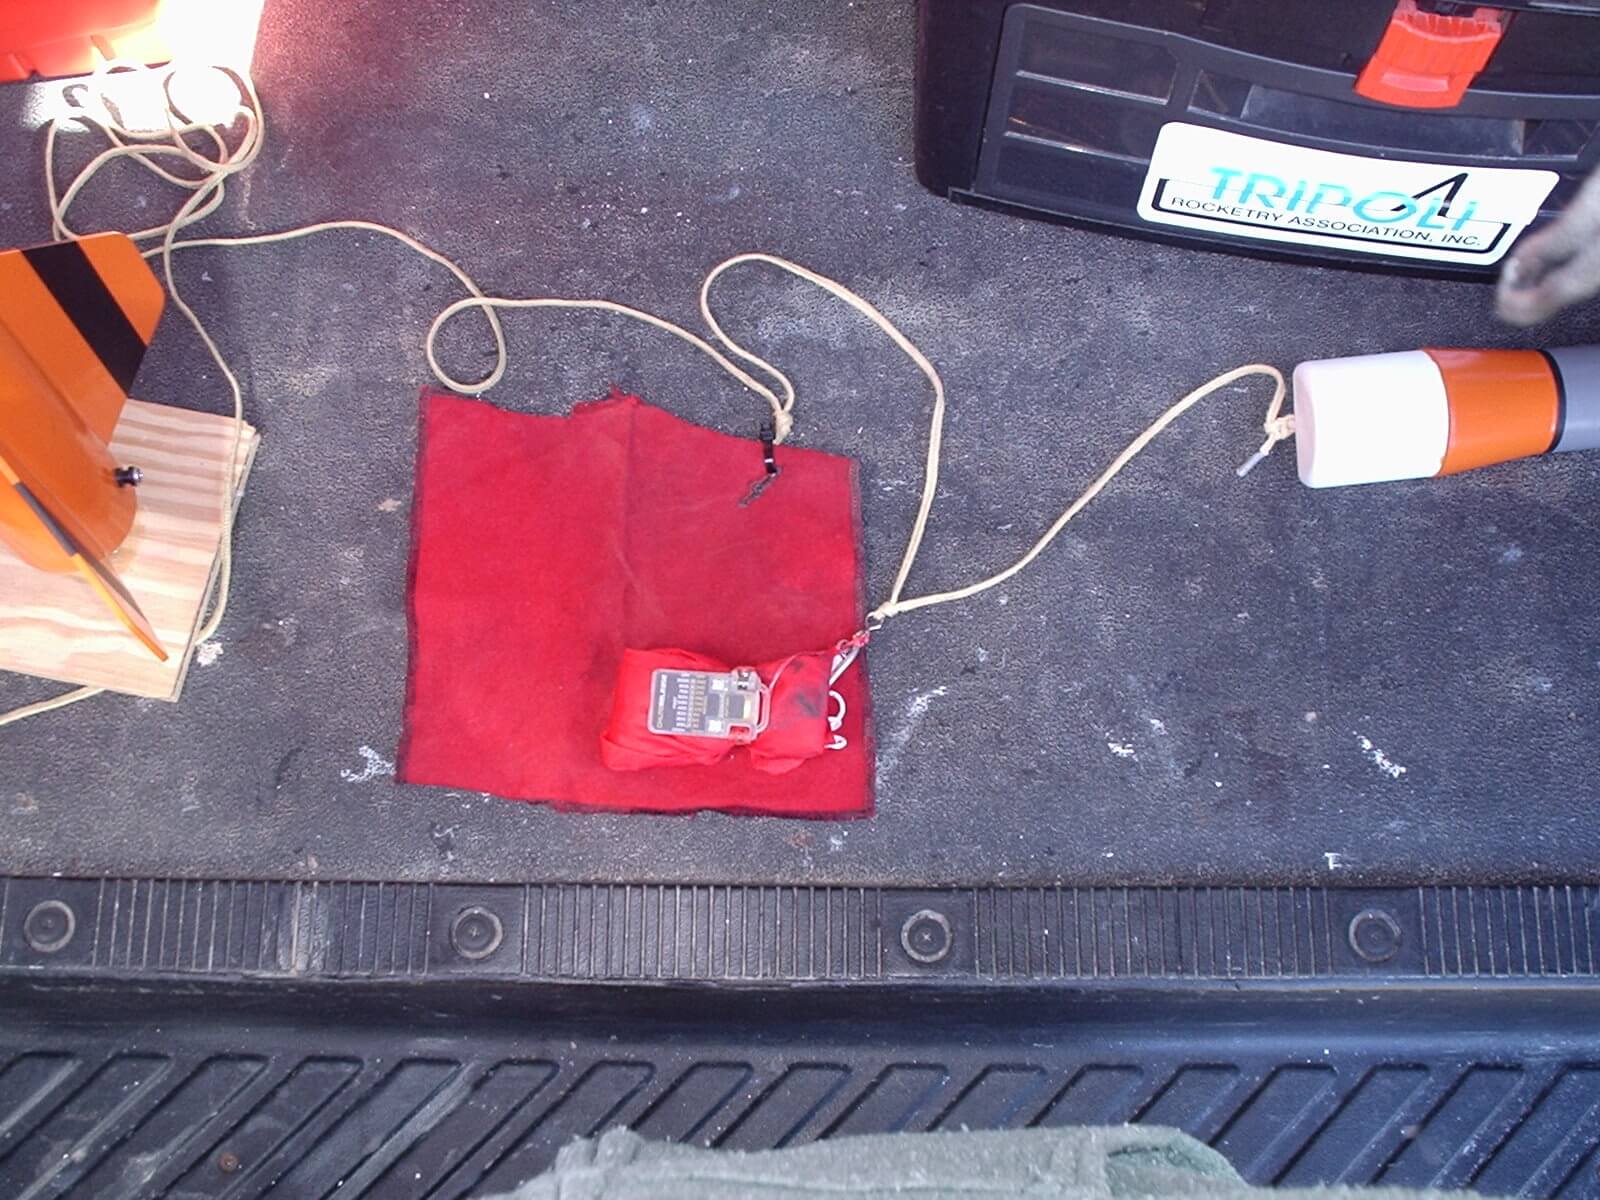
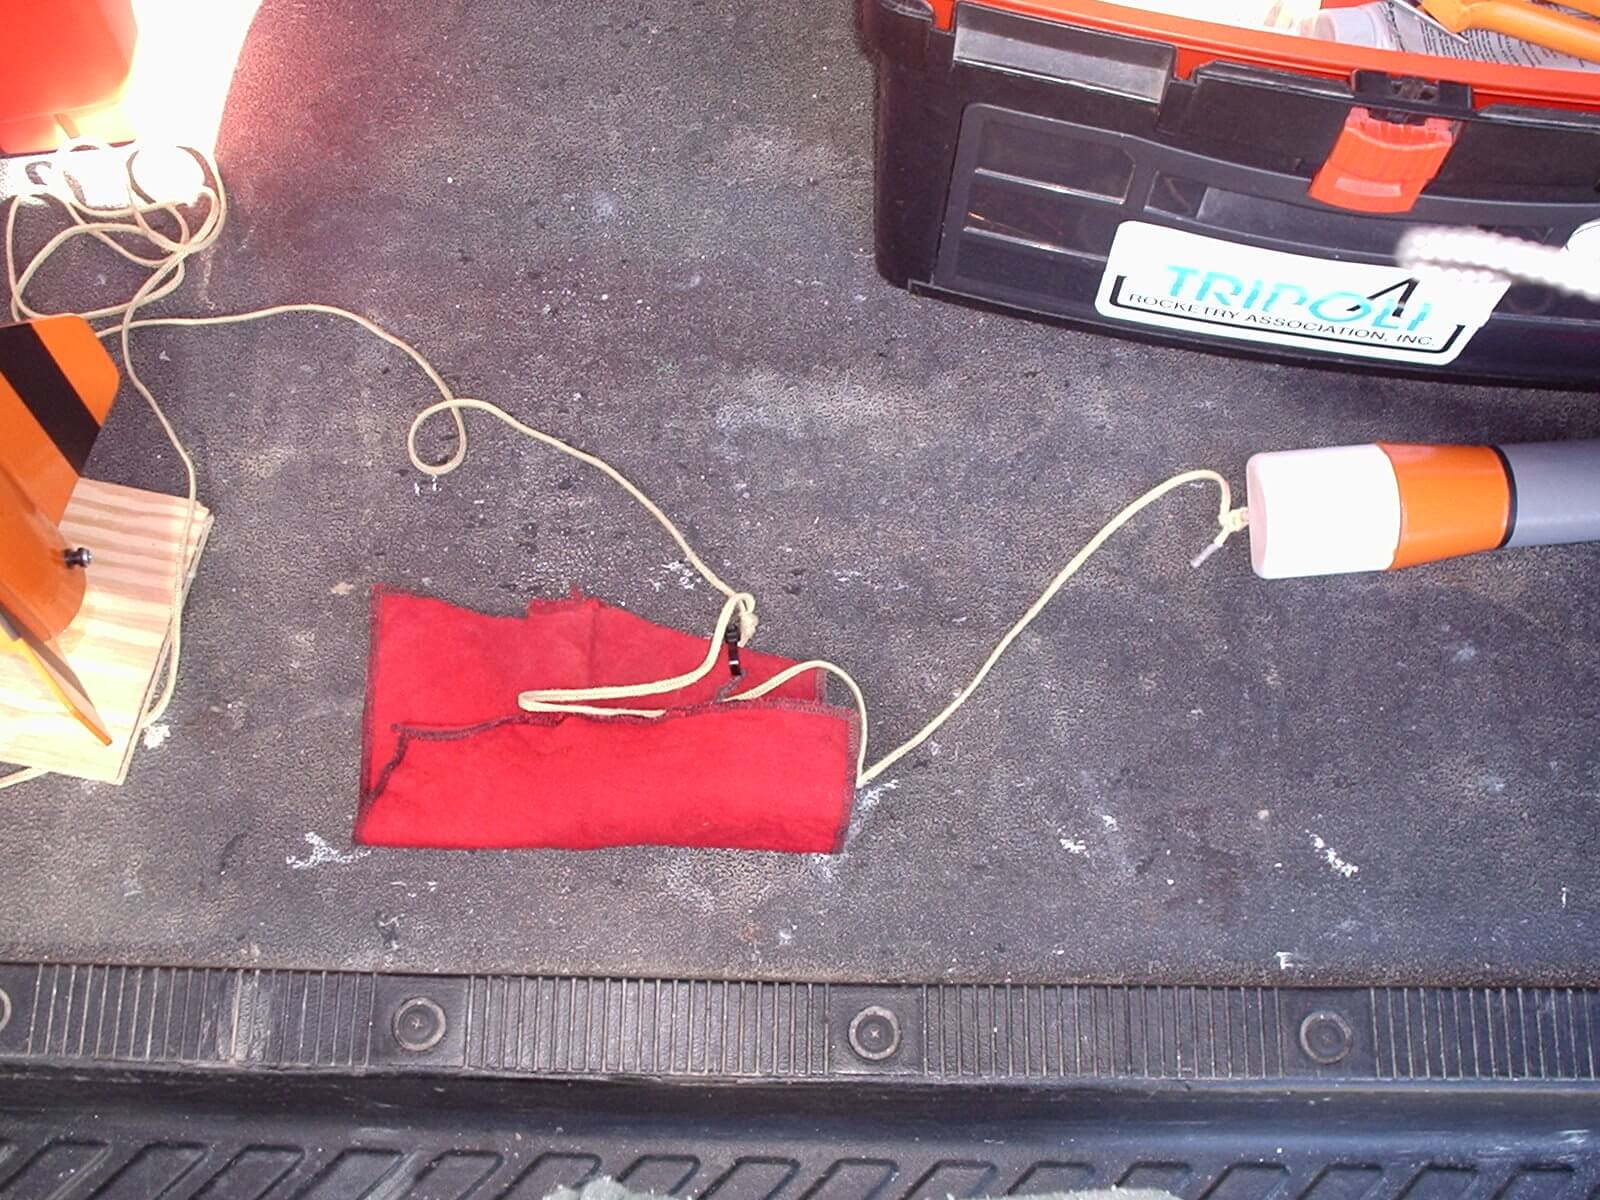
I had a chance to attend the Tripoli Mid Ohio launch and was able to do a number of flights using the chute release. Since I had limited time, I decided to test one thing, namely using Chute Release with a fire blanket. I figure many do not use or install baffles in their rockets. Many will purchase this item and want to protect it, but may not have a baffle. I concede that this method will create limitations on tube diameters etc. but it is what it is.
For this test I used a 2.5” Estes Sahara kit. So off we go.
The flights were on F40-W then a G40-W then a G80-T. On ALL flights Chute Release performed perfectly. The unit did not get any burn marks on it except the last flight but it was very very minor. As the photos show, I wrapped the whole lot in a fire blanket. The force of the nose cone removed the bundle from the blanket and it all seemed to work perfectly. The only thing I would change is I would increase the distance between the blanket and the bundle. I also think when using this method that one should be really sure things are not packed to tight in the tube. Either way I will do more flights and see what happens.
When I got to the launch, I was surprised after all the interest on this product from the forums, that NOBODY heard of it. So, I did a lot of demos and at times I felt like a marketing rep! At one point I did a demonstration at a table with about six guys watching. They were all extremely impressed. One guy said this is going to change things in a big way. I did have a guy ask if he could try it on a high power rocket with single deploy. I set it up for him and he launched a PML kit on an H motor with a 45″ chute. Again the flight went off without a hitch to over 2000 feet. He had a piston in his rocket so we did not use a baffle.
All release recoveries were set at 400 feet.

How to Operate Chute Release
As flight testing begins, the user interface for Chute Release has arrived at what we think will be the final version. We’ll see how well it works out during actual usage.
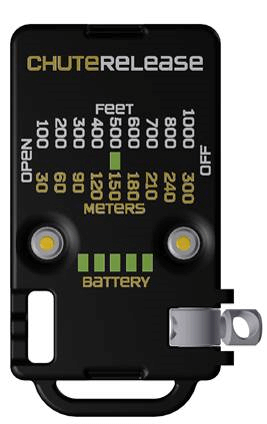
Let’s take a look at a pre-production copy of Chute Release (the final will look much more polished). The LEDs are quite bright, because they need to shine through the final black case and be readable in daylight.
There are two buttons on Chute Release. Either button will wake up Chute Release if it is turned off or in power-saving mode.
Once Chute Release is turned on, you can press the buttons to raise or lower the release altitude.
To turn off Chute Release, just keep pressing the ‘up’ button past the top of the range. The lights will flash and Chute Release will turn off.
To ground test Chute Release, press the ‘down’ button below the lowest altitude. The lights will flash and Chute Release will perform a countdown and release 5 seconds later. Then it will power down.
In either case, when you turn Chute Release back on, Chute Release will return to the most recent release altitude that you selected (even though you mashed the buttons to turn it off or perform the ground test).
After one minute, Chute Release saves power by turning off the battery meter and just flashing the release altitude periodically. You can return the display to normal mode by pressing either button.
Chute Release for Rocketry Ready for Testing
Those of you who have heard me talk at the National Association of Rocketry annual meetings know that Jolly Logic has been developing a parachute deployment product for model rocketry which gives you control over when your parachute opens. (If you are into rocketry and you’re curious about what we’re working on, the most recent talk at Cape Canaveral gives a good peek into our rocketry product roadmap.)
This week we reached the flight test stage of the parachute deployment product, which we are calling Chute Release.
Chute Release aims to address a couple of issues for rocketry:
- Drifting too far on parachute
- Damage to rockets when the parachute is ejected too early or too late (“zippering”)
The traditional answers to “my rocket goes too high and drifts too far” (or my field is too small) are either to use a smaller chute, or to move to dual deployment. With smaller chutes you run the risk of damaging your rocket on landing. With dual deployment you need to build a more complicated rocket that uses an electronic controller to set off explosive charges that deploy the parachute at a lower altitude, rather than high up at apogee. There has to be a better way, right?
Chute Release lets you choose when you want your chute to open, even for simple rockets with basic motor ejection. It works by holding your chute closed with a stretchy band until your preset altitude is reached, then it lets the parachute open.
Here’s what the final product will look like:
The working prototypes aren’t quite as nice looking. Here you can see that the 3D-printed case is transparent (so that we can see the internal parts moving while we test). The final version will be tough polycarbonate, while the metal parts will be aircraft aluminum:
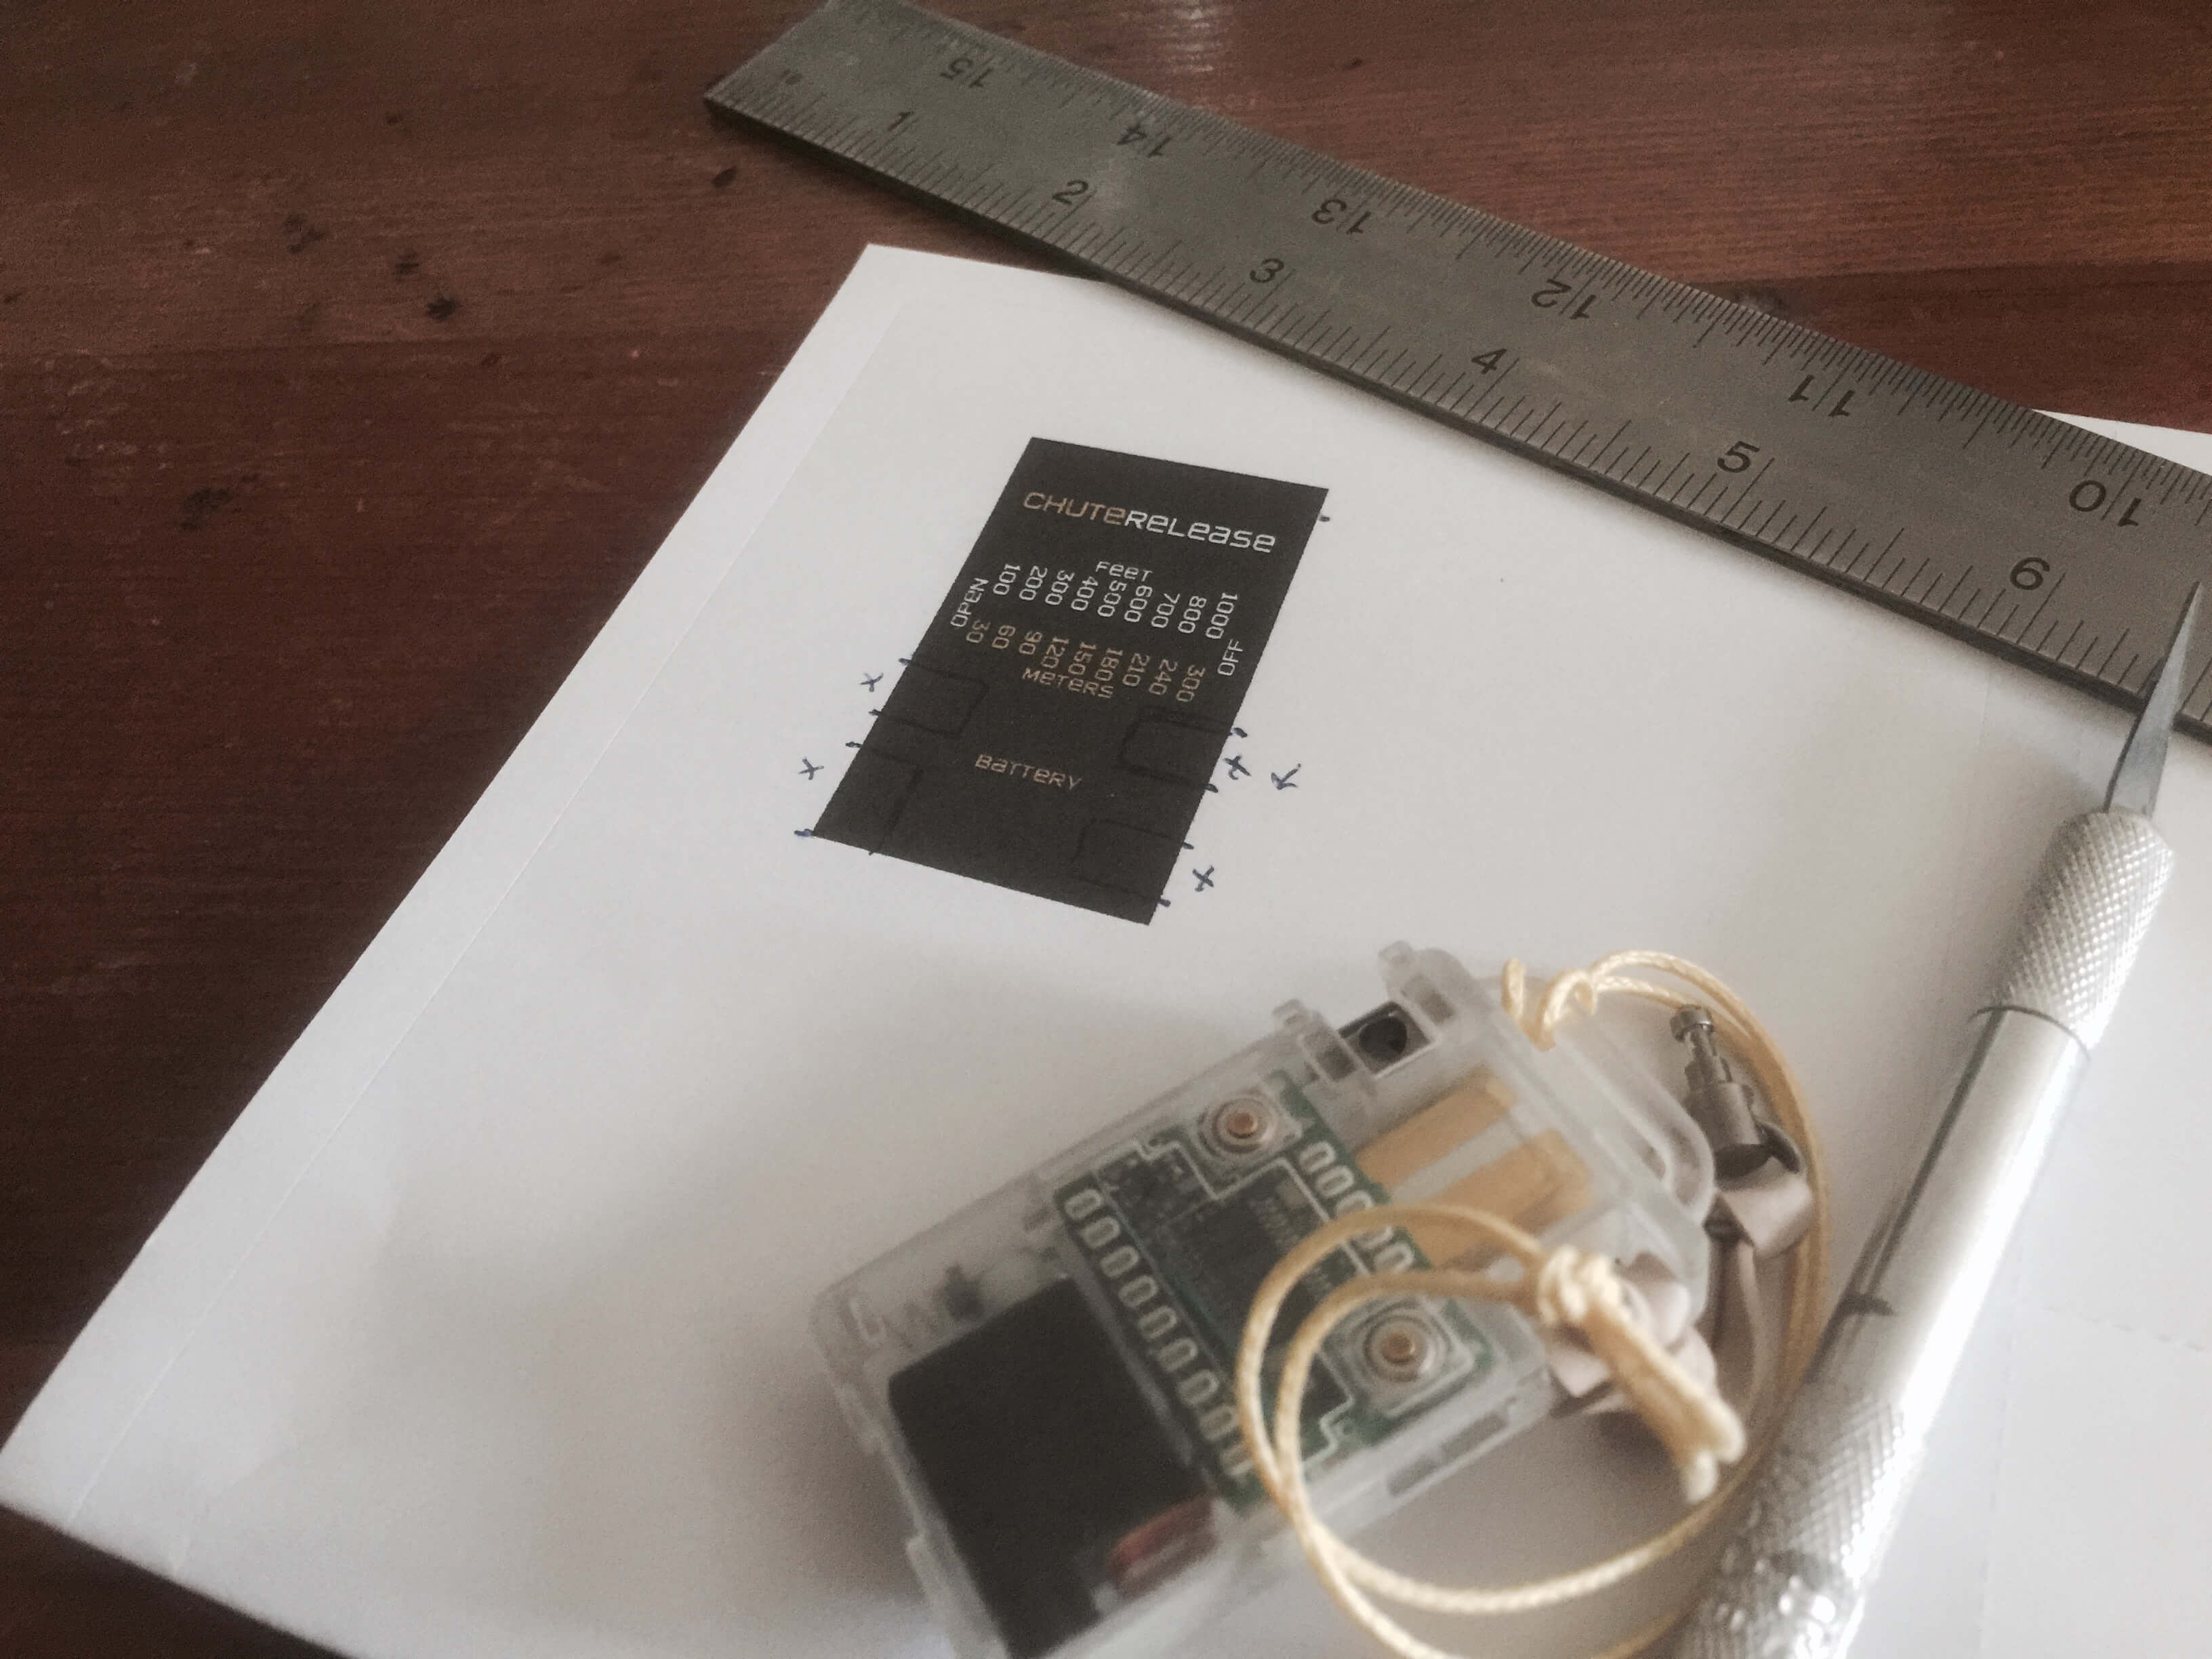
We printed and cut out a label to mark the altitude settings, then applied it to the front face of the release.

Which doesn’t look too bad. Good enough for testing.
Chute Release is designed to be extremely easy to use. As a first step, you attach the tether to one of the parachute shroud lines (so that you don’t lose your Chute Release). Then, you gather the bottom of your parachute together and wrap the band around it and snap the pin into the other side of chute release. That holds your parachute closed until you want it to open. Then you use the buttons to set an altitude. You can pack your chute however you like after that, including rolling it up.
Chute Release includes a “ground test” feature. This lets you open it on the ground, and it includes a 5-second delay to let you arrange it or tug on it as you see fit before it opens.
It will be fun to experiment with different ways to use Chute Release. For instance, you can wrap the bottom of your chute and leave the top part of the chute free as a streamer/drogue to slow the descent a bit and to keep the parachute lines and shock cord in nice vertical “stack” (as shown in the video). Or you could bundle your parachute into one nice tidy small package with Chute Release holding it together.
Here is Chute Release being tested in Jolly Logic’s vacuum chamber. This particular test (100 ft) is the lowest one and the final test run. You can see and hear Chute Release letting go of the pin as the altitude on AltimeterOne (in realtime mode) passes 100 ft.
A nice benefit of Chute Release is that you can use a larger chute than you normally would. You can choose your chute to give a soft landing without worrying as much about how far it will drift on winds aloft. We thought about calling this product “HALO,” after the skydiving term which means “high altitude, low opening,” but then we’d have to explain what that meant…
Of course, like all Jolly Logic products, it’s rechargeable from any USB port, and uses the same USB Micro-B port and cable as our other products. With tether and band in final configuration, the prototype weighs just over 14 grams (0.5 oz), and is 54 x 31 x 10 mm (2.1 x 1.2 x 0.4 inches) in size.
The max altitude is essentially unlimited (it only cares about the lower 1000 feet or so), and acceleration should not be a limiting factor (short of breaking the electronics or causing a wire to pull out).
You can daisy chain two Chute Releases together around the chute (each snapping into the other) to be redundant (if either opens, the chute deploys).
It won’t fit in every rocket. Practically speaking, the smallest rocket tube that it will fit will be the 41mm (1.64″) BT-60 (Big Bertha) size tubes, and perhaps the international 40mm FAI size. We’ll test in a 38mm rocket, we know there’s great interest from the high-altitude crowd for that. Unless/until we can design a smaller Chute Release, we’ll market this as more of a medium-to-high power product, for motors F-K, since that’s a range that reaches higher altitudes and still usually relies on simple motor ejection.

Flight Simulations
In case you’re wondering how big of a difference Chute Release can potentially make, let’s look at some computer-simulated flights.
Without Chute Release
In a slightly breezy, 8-14 MPH wind we set up two simulations: one in which the parachute comes out at ejection, and another in which it doesn’t open until 200 feet.
Here are the flight settings for a flight without Chute Release:
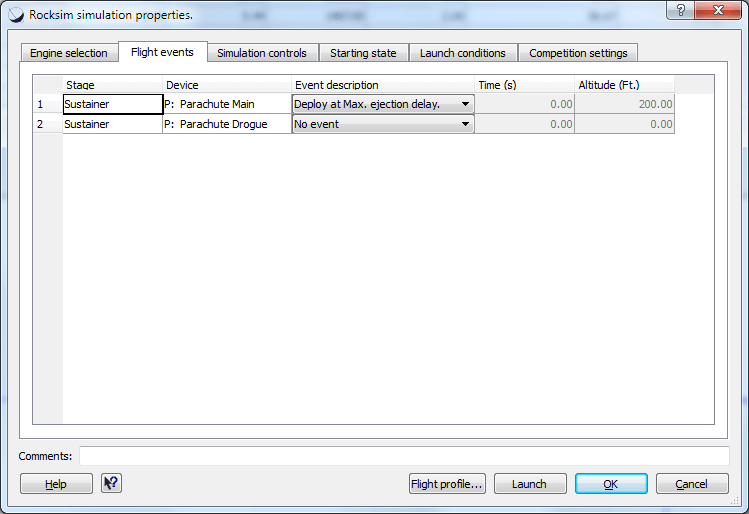
Here is the trajectory of that flight:
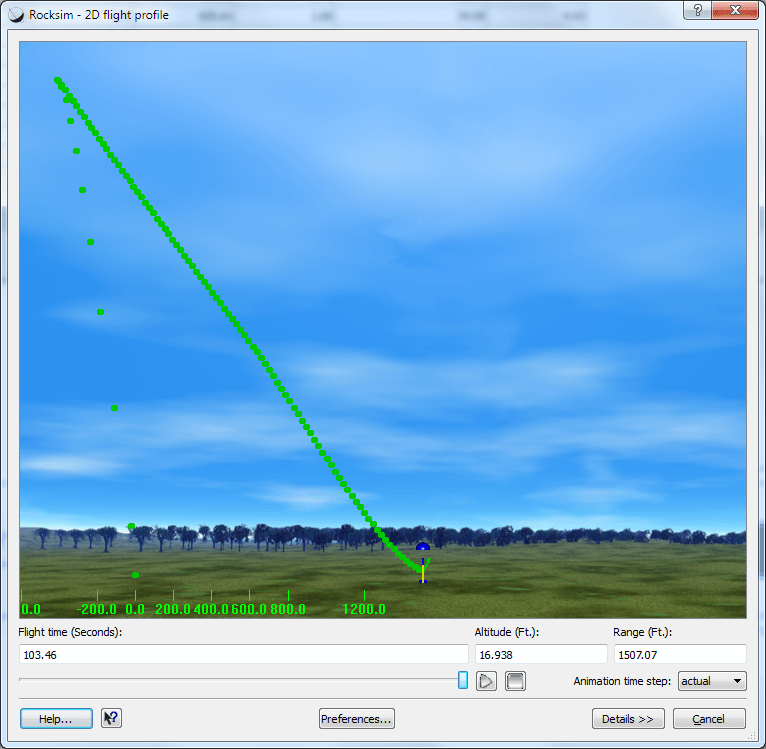
Notice the “range” of the flight. In this simulation, we would have needed to walk 1507 feet to retrieve our rocket.
With Chute Release
Now we model the flight with Chute Release. Here are the settings:
Before the main chute opens at 200 feet, we’ve modeled the falling of the rocket as if it was riding on a tiny 8 inch chute. That’s to approximate the rate at which the rocket would fall as it tumbles with the parachute being held.
Here is the flight trajectory:
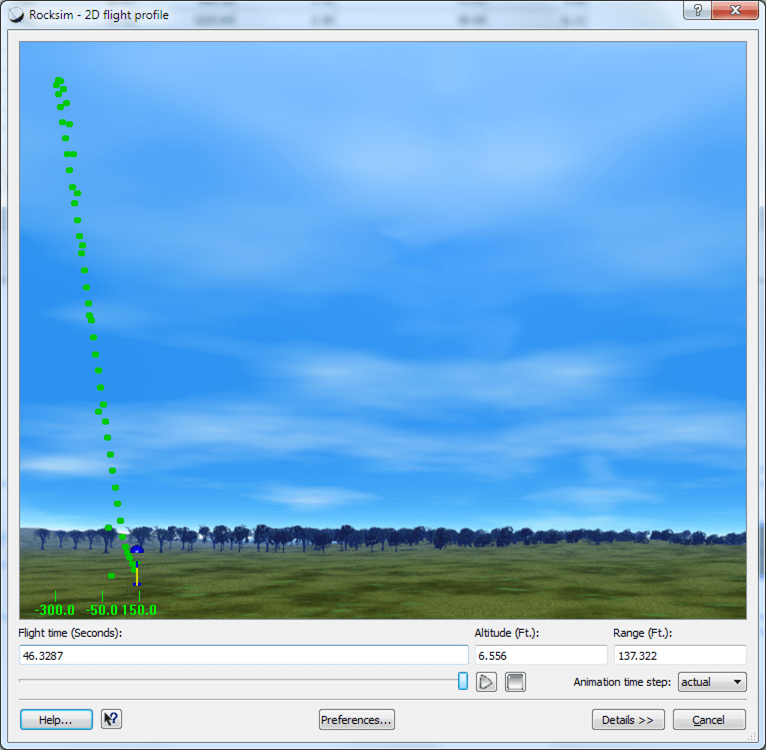
This time our walk has been shortened to 137 feet, making it much easier and much likely that we can easily find our rocket.
We also ran the simulation in heavier wind, and here are the results:
| Flight | Wind | Chute Release? | Walk Distance |
|---|---|---|---|
| 1 | 8-14 | No | 1507 |
| 2 | 8-14 | Yes | 137 |
| 3 | 15-25 | No | 2327 |
| 4 | 15-25 | Yes | 352 |
We’ll post updates after testing. Let us know if you have any thoughts or questions on Chute Release at info@jollylogic.com.
AltimeterThree’s Glider Mode Put to the Test
Aris Kosmides is an avid RC flyer in Thessaloniki, Greece. He was curious to see how well AltimeterThree would perform in his gliders, and here’s his report on his experiences.
AltimeterThree by Jolly Logic
This new gadget is a very interesting tool for RC enthusiasts.
I had the chance to test the unit, and I am very enthusiastic about it.
This airborne unit is just 50 X15 X18 mm, so it is small enough to fit even in very small fuselages, and it weighs a scant 10,4 grams!
First you need the download the pertinent software on your Smartphone, and then connect it with the airborne unit.
It connects via Bluetooth with smart phones or tablets, and it records data from your flight. You can call it a black box, but you don’t have to crash in order to get the data.
Before you fly you must select your mode from the following options: (Airplane, Glider, Quadcopter, Glider, Helicopter, Rocket, Raptor, Kite, Experimental).
Once you land all data is transferred to your Flight Review screen. You get flight duration data from take off time to landing. This is done by use of accelerometers in the unit, and it has been very accurate for all my flights. It will also give your Maximum altitude during the flight. On a chart page it provides the vertical profile. Finally (if you have GPS on your phone) it can point your take off location on the map . If you want to share this data with friends that can easily be accomplished from the software with many possible options.
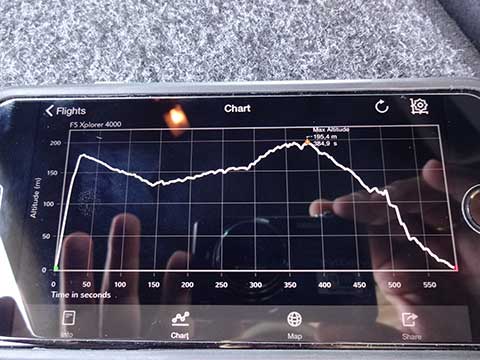
In the past I had some bad experiences with smart phones and drones. So I wouldn’t dare to flight first time with my new Xplorer 4000 glider. My old small FlyingStyrokit Focke Wulf 190 was my choice for the first flight. I flew it for 2mins 49 seconds and I tried to fly as high as I could possibly see the plane. And that was 388,3 meters!
My next flight was with the Hyperion Cap-580 which flew some aerobatics for 3:54 and a max altitude of 200,9 meters. Then I was ready to get in the most interesting mode of Gliders with my F5J Xplorer2 4000.
I flew four times and I loved the AltimeterThree. Each time the vertical profile gave me lots of information to consider and evaluate my flight. Besides AltimeterThree I had the ALTMR2 to compare the accuracy of the altimeter data. The ALTMR2 is an Altitude Motor Run Timer (AMRT) device approved by FAI for F5J competition. It is made from Greek Electronics Co. and I consider a vey accurate unit. During my glider flights the maximum difference between the two altimeters was 80 cm. and the average difference was 50 cm. I believe this accuracy is excellent for RC use. The difference between the two is that the ALTMR2 records the start height which is the maximum height achieved from take off till 10 seconds after motor stops, but the AltimeterThree records the Max Altitude from entire flight. So during my fifth flight I climbed to 179,6 according to ALTMR2, but then after about six minutes I found some thermals and climbed up to 195,4 meters according to AltimeterThree. I am sure that by now all glider pilots already wish for a special version of the AltimeterThree which will point both start height and Max height.
You won’t have to wait for long because I am already speaking with John Beans, President of Jolly Logic. I believe that this small gadget can easily change to something which will revolutionize the way we compete and practice with gliders.
In Greece we have many small RC clubs and a strong gliders community, but it is never easy to find several timekeepers and organize F5J FAI events.
The next thing I am sure glider pilots will ask from Jolly Logic is to record the flight path on the GPS map. This is also in the plans of a future project. To do so the unit must have a GPS chip and antenna, but I am not sure if it will worth the size and weight penalty.
For a last flight I decided to fly the Cap-580 as low as I could possibly do shooting touch and go’s.
I did 12 of these in 6:13 at a max altitude of 20.7 m. The chart looked like a cardiogram!
More information about this product can be found at www.jollylogic.com, and you can make sure your smart phone or device is compatible with the unit before you purchase one.
With all that said and a price tag of about $100 I give it 5/5 stars and I can’t wait for AltimeterFour, well done Jolly Logic!
Aris Kosmides
Note: Just as Aris has suggested, we will be adding a “Glide Start” marker to the next release of the AltimeterThree app.
Reliable AltimeterThree Connections
If you begin to suddenly have trouble connecting to AltimeterThree from your phone—or downloading flights—it may be because your battery is low.
It’s a good idea to keep your altimeter fully charged, and that goes for any product you might have that uses a rechargeable lithium battery. Lithium batteries like to be kept fully charged, and it doesn’t hurt to leave them in the charger. Smart circuitry prevents them from being overcharged, and the added power will prevent AltimeterThree’s wireless radio from dropping out and spoiling your connections.
AltimeterTwo Version 4.0 Enhances Ejection Detection
AltimeterTwo is great for automatically analyzing rocket flights. But there have been situations where it mistakenly thought that parachute ejection occurred right as the motor stopped firing.
For most rockets, this situation was not encountered. But if your rocket naturally decelerates very rapidly after burnout—because of the right combination of large diameter, high drag, or light weight—then you might have seen this situation. It was repeatably seen in Crayon rockets, for instance, since they are relatively thick and light and can fly on smaller motors. The result would be a very negative Apogee-to-Ejection number (because Ejection was detected before apogee) that was almost the opposite of the Coast-to-Apogee figure (which would have still been calculated correctly). The ejection altitude would also have been very low (near where the motor stopped firing).
Version 4.0 of AltimeterTwo was developed to better judge ejection detection in these situations. It is a little more picky about the kinds of shock that define ejection. Hopefully it won’t miss gentle ejections. We’ll keep our eye on that.
If you have an AltimeterTwo prior to version 4.0 and would like to upgrade your firmware, just mail it to us. We’ll flash it with new firmware (you’ll lose your recorded flights) and send it right back to you.
Mailto:
Jolly Logic
231 Daylight Pl
Danville, CA 94526
Be sure to include your name and return address!
How AltimeterThree Influenced Last Year’s Designs
When we updated AltimeterOne and AltimeterTwo in 2014, a few changes were obvious improvements:
[ordered_list style=”decimal”]
- A more graphical display
- A larger battery
- Storage for 100 flights
- Recharging cable, instead of “plugging in the whole altimeter”
- A more sturdy attachment point
- Replaceable parts
[/ordered_list]
But what was somewhat surprising (for those who appreciate our emphasis on keeping things small) is that the products were slightly LARGER than their predecessors. Why was this?
The reason is that the products were to share their form factor with the latest addition to the family, AltimeterThree.
AltimeterThree required an architecture that could accommodate a Bluetooth radio and a flash drive, and the new architecture allowed us to add those.
Metric Bug Found
If you use your altimeter in metric mode and have a new generation AltimeterOne Version 2.3 or AltimeterTwo Version 3.8, you should send it to us to be upgraded, because we have found a bug that incorrectly displays metric units in these particular versions. The data is measured and stored correctly in feet, but the results are incorrectly displayed in metric units (meters and meters/sec).
If you have:
AltimeterOne (Version 2.3)
AltimeterTwo (Version 3.8)
Jolly Logic
Upgrade Department
231 Daylight Place
Danville, CA 94526
The upgrade takes about six seconds, and we’ll ship it right back out to you.
The Next Generation
The look of AltimeterOne and AltimeterTwo have changed. Here are the main differences between the “classic” versions and the new ones:
There are other, more subtle changes, too. We’ve taken suggestions from you and incorporated them into the products to make them better and more convenient to use. Some of these are things you’ll probably never notice (faster processor, improved filtering algorithms), but others (like more clearly labeled on-screen items) you’ll notice right away.
The new generation of product also serves as the platform for the upcoming AltimeterThree, which introduces Bluetooth wireless, smartphone integration, and social media sharing. (Stayed tuned!)
Quadcopter High Altitude Flight
Jesse Ferrell, who works for Accuweather, strapped an AltimeterOne to his Phantom quadcopter in the field of view of this GoPro camera and captured this flight up to just under 2,000 feet. The quadcopter was actually out of control range, but returned via autopilot to Jesse. Switch to HD resolution to see the real-time altitude display in the video.
Trends in Rocket Electronics
Jolly Logic’s founder John Beans discusses the ways that electronics can improve rocketry (including some upcoming products) in this presentation to the National Association of Rocketry’s recent annual convention. His talk includes discussion of wireless tracking, electronic parachute deployment, and integration with Apple and Android mobile devices.
[youtube=http://www.youtube.com/watch?v=1OgUF-Ky-Os&w=640&h=385]
Free Shipping
If you haven’t already noticed, we ship for free within the United States. According to the postal service, shipping via USPS First Class means that your package will arrive within 2-8 days. However, if you live in Northern California, you may get your purchase the next day! So if you need your purchase in a hurry, take a few moments to check out the USPS site before you pay for Priority or Express shipping, because First Class may get it there in the same time.
Beta Testers Needed
Interested in being part of the development of new products?
Jolly Logic is looking to expand its beta testing program for upcoming products. Beta testers help by testing new product prototypes in order to help us as we develop the firmware and get the features to work as easily and reliably as we can. Sometimes features are added or removed during beta testing. For instance, when the AltimeterTwo began testing it showed just two results (top speed and altitude). Eight more were added during the program (ejection altitude, flight duration, max and average acceleration, delay times, engine burn time, and descent rate).
Pros
- » Work with cool new products before anyone else
- » Have an impact on how products work
Cons
- » The product likely won’t (yet) work correctly
- » It requires a little work on your part to keep a record of your tests
Here’s a typical day in the life of a beta tester:
You: “Hey, yesterday the [PRODUCT X] did something crazy. While I was doing [SOMETHING], it started flashing ‘ERROR’ and then shut off. Now it won’t turn on.”
Jolly: “What were you doing exactly?”
You: “Let me look at my notes…” [EXPLAINS IN DETAIL WHAT HAPPENED]
Jolly: “Oh. Yeah. Turns out you can’t do [SOMETHING] in that order yet. There’s a bug. I’m sending you a new unit. Send that one back.”
You can imagine that using a product before it works reliably can be frustrating, but it’s all part of product development. If you think you’d like being part of that, let us know.
Email us at beta@jollylogic.com if you’re interested.
Sneak Peek: Even Cooler LCDs
It’s not quite time to release information yet on our next round of products, but we can offer a sneak peek into one of the new components that will be on display (pun intended) when we do.
We love clear, easy-to-read displays, but as our products get more sophisticated and powerful, the displays need to keep up. So we’ve designed a new one.
Here’s what the new family of displays will provide:
1. The ability to show bitmapped fonts and graphics
2. Smooth animation and scrolling and menus
3. Connectors that let you replace a broken display yourself
Here’s what it looks like:
A High Performance AltimeterTwo Mount
Interested in wringing the most performance possible out of your AltimeterTwo?
Steven Collins has written a step-by-step guide that walks you through both the math and the construction of a special mount that orients the AltimeterTwo at just the right angles to extend its acceleration range to 40 Gs.
So if you think your rocket might be breaking the speed of sound in under a second, you’ll definitely want to check this out.
The article was published by Apogee Components, a Jolly Logic distributor and great source of rocket-related information, in their Peak of Flight newsletter.
 |
|
Picked by the New York Times

 |
Today the New York Times picked the AltimeterTwo as one of its top picks for Father’s Day this year. Very cool!
Here’s what they had to say: “ALTIMETERTWO ($70) There is nothing like that the rush of a rocket launch. And now, tiny shockproof sensors can ride along. The size of a thumb drive, the AltimeterTwo, with an LCD display, barometric pressure sensor and a three-axis accelerometer, can capture your rocket’s speed and height. The battery charges from your computer’s USB port. To carry the sensor, Apogee, the rocket’s reseller, recommends the large-finned Dynastar ($42) with a cargo bay large enough for an egg, or a Hot Wheels car.” You can read the entire article here. |
It’s Here!

*** FOR RELEASE ON MAY 25 ***
Jolly Logic Announces Release of the AltimeterTwo
May 25, 2011 — Danville, CA
Jolly Logic today announced the commercial release of the AltimeterTwo, a small rechargeable barometric and accelerometer-equipped altimeter for model rockets that includes advanced flight analysis features.
In addition to peak altitude, the AltimeterTwo reports:
- » Top speed (in MPH or KPH)
- » Engine burn time
- » Peak and average acceleration under thrust
- » Coast time to apogee
- » Apogee to ejection time
- » Ejection altitude
- » Descent speed (in MPH or KPH)
- » Total flight duration from ignition to landing
All of these statistics can be reviewed on the LCD screen of the AltimeterTwo following each flight, even in bright sunlight. The AltimeterTwo weighs just 6.7 grams (0.24 ounces) and is the same size as the company’s popular AltimeterOne which it released last year.
“One of the key design goals for the AltimeterTwo was to make it convenient to use,” said John Beans, Jolly Logic’s founder. “You can drop it into a payload section, or just clip it to your parachute line. It doesn’t need a lot of babying, and it can be moved from rocket to rocket easily.” The addition of a sophisticated 3-axis accelerometer allows the AltimeterTwo to work in any orientation, with no special mounting requirements, and now provides instant speed measurements for every flight.
The flight statistics provided by the AltimeterTwo can be useful in comparing the effect of different motors, delays, airframe modifications, weight, and parachute recovery equipment. During recent beta testing, advance units were in high demand during the height of this year’s high school science fair season.
For more information, go to www.jollylogic.com. The AltimeterTwo is available now for $69.95, and can be ordered online from www.apogeerockets.com and selected local retailers.
Media contact: John Beans, john@jollylogic.com
¯ ¯ ¯
The AltimeterOne Goes to Space Camp
Todd Treichel is senior engineer for Orbital Technologies Corporation. ORBITEC makes a number of systems and components for real space projects, including propulsion and life-support equipment for space shuttle missions and the international space station.
Todd also works with local high school students to teach them engineering and science, and he used the AltimeterOne on a recent teaching project. The goal of the project was to teach the students about scientific measurements and statistical analysis. For the project, Todd and his students loaded the AltimeterOne into a high altitude pressure chamber and exposed it to varying degrees of vacuum, simulating altitudes all the way from see level to 29,500 feet (the published range of the AltimeterOne).
Into the Vacuum Chamber
The little AltimeterOne looks a little lonely in ORBITEC’s big vacuum chamber. The photos capture one data point taken at 29,420 feet, near the top of AltimeterOne’s service ceiling.


The AltimeterOne in Orbital Technologies’ vacuum chamber
Stellar Results
Todd and his students plotted the readout of the AltimeterOne versus the pressure in the chamber. Using the Standard Atmospheric Model to convert the vacuum chamber pressure to altitude, here’s how the readout of the AltimeterOne compares to the calculated altitude using their measurements.

That shows that the AltimeterOne is really doing a phenomenal job at measuring pressure and calculating altitude!
Coming in May 2011: The AltimeterTwo
New for May 2011, the AltimeterTwo packs even more power into a package the same size as the AltimeterOne. With the addition of a triple axis accelerometer and a processor that is four times faster, the AltimeterTwo can now measure speed, acceleration, and the timing of events throughout a rocket’s flight.

The AltimeterTwo provides a fairly extensive flight analysis, including:
1 » Altitude at apogee (FT or M)
2 » Maximum speed (MPH or KPH)
3 » Engine burn time (sec)
4 » Maximum burn acceleration (Gs)
5 » Average burn acceleration (Gs)
6 » Coast time to apogee (sec)
7 » Time from apogee to ejection (sec)
8 » Altitude at ejection (FT or M)
9 » Average descent speed (MPH or KPH)
10» Duration of flight (sec)
A couple of points are worth noting:
» You don’t need a computer to use the AltimeterTwo
» All of its features can be used outdoors, in bright sunlight
» Because of its specialized flight logic, it’s for rockets only
» Like the AltimeterOne, it does NOT download data (it just displays it)
In keeping with the overall design theme of the product line, the AltimeterTwo is analogous to a high-end “point and shoot” camera. It gives you the data you need to maximize your flying enjoyment, without all of the care and feeding of a computer-based recording altimeter. It’s designed for and by rocket enthusiasts to stand up to rough treatment and real-world flying conditions.
Expected retail prices:
AltimeterOne: $49
AltimeterTwo: $69
***
AltimeterOne Enhancements
We’re always looking for ways to improve. Thanks to our customers and dedicated beta testers, we’ve designed some neat improvements to the AltimeterOne that we’ll be phasing into production soon. Upcoming enhancements to the AltimeterOne include:
» A second generation case design to increase ruggedness
» An enhanced screen to indicate battery charge
» Optional display of metric units for international users
» New, high-quality retail packaging

The new case will hopefully eliminate those situations where a sudden impact could crack the glue seam of the case. In most cases, this was occurring either during rough landings (a fall from 1,000 feet without a parachute, for instance) or in high power rockets where the ejection charge would slap the altimeter violently against the bottom of the nose cone. The new case is designed with some pretty rough conditions in mind, gives the altimeter a little more of a “rugged” appearance, eliminates the entire gluing process, and actually lowers the weight of the altimeter slightly.
Expect to see these changes appearing soon, as well as an expansion of the product line!
***
Supply Chain Challenges
Our printed circuit boards and packaging are manufactured in California. Our source of custom Lithium batteries is based in Hong Kong. Injection molded parts and LCD displays are created in China, while the heart of our test equipment originated in Hungary. There were great reasons for choosing each—they are all “best of breed”—but what do you get when you add all of this together? A lot of shipping!
And even more than that, time. Along with the complexity of coordinating so many companies to bring together even a product as tiny as the AltimeterOne. Every one of these partners was very carefully chosen but even so, there are inevitable hiccups. A slow down from one partner can result in a plea to another to try to make the time up somehow.
We’re very fortunate that our production partners have been so responsive–and willing to work hard to resolve issues quickly. While we’ll always look for ways to bring costs down and reduce the time it takes to manufacture, it’s worth noting that globalization has its challenges, too.
First Look at the AltimeterOne

Here is an early look at the AltimeterOne. Most of the components are the final production versions, though the case is a pre-production sample. The final case will be translucent so that the unit will glow red or green to reflect its recharging status. Most of the final effort is software related, to ensure trouble free operation and long battery life.
Best Practices in Lithium Battery Management
Lithium batteries have some great properties, and some *not so great* properties.
[table “4” not found /]
For ultra small devices―like the AltimeterOne―that include sensors, displays, and other sophisticated components yet need to be as small and light as possible, there really isn’t a better alternative to Lithium chemistry batteries. While there are some rather small Alkaline, NiCd, and NiMH batteries available (some as coin cells), they are typically limited in voltage (1.2-1.5V), current (a couple of milliamps), and capacity (<10mAh). And so we need to overcome the challenges of Lithium cells.
The best way to do this is to design for Lithium from the onset, and compensate wherever possible for the drawbacks. For instance, the AltimeterOne has three independent circuits to ensure safe operation. One is mounted directly to the power cell to strictly limit both charge and discharge current, and to shut the cell down if its temperature rises too far. The second circuit oversees the charging of the cell, and limits the maximum current that can be applied―starting very slowly at first, and stopping the charging process entirely once it detects that the charging is complete. The final circuit monitors the voltage of the battery and lets the microprocessor know that it’s time to remind the user to recharge.
As for cost, the batteries and their support components have been dropping in price as the technology has matured, and as more alternative suppliers have come on line. There is now plenty of competition among battery and support chip vendors—and that has brought prices down nicely.
Notice that the cost to provide recharging capability for the Altimeter One is reduced by the clever incorporation of a charging plug into the device itself, eliminating the cost and complexity of an extra cable or adapter!
♦ ♦ ♦
We Live in a Time of Amazing Tools
Though my children already take this sort of thing for granted, it still is striking to me how easy it has become—just within the last few years—to make things. Here’s a few capabilities that I really appreciate, all of which of course rely heavily on personal computers, the Internet, and increasingly integrated electronic components:
- Software that makes it easy to design circuit boards, enclosures, and embedded software
- Online forums of people who share design advice (and common mistakes)
- Factories and component distributors around the world which take orders over the web
- Desktop prototyping tools such as computer-controlled milling equipment and miniature circuit board soldering ovens
- Inexpensive and tiny chips that handle processing, sensing, and networking
- Practically ubiquitous wireless networking (WiFi and cellular)
Guys who were born circa 1950-1955 (Gates, Joy, etc) did okay for themselves as part of the vanguard who brought to market the base technologies in this list. But some really neat times are still to come, as new products begin to be created by an exponentially larger group of people around the world, and our standards for “what makes a good product” continue to be refined.